This article features the Starlink installation in Jacksonville, FL that was successfully completed by ProSat Networks 1-844-799-0258. We offer professional Starlink installation and IT network solutions for commercial businesses, residential homes, RVs, RV parks, campgrounds, construction sites, farm, airplane hangars, mining facilities and long-range, multi-building indoor and outdoor wireless networks across Florida.
To book your Starlink installation, call us at 1-844-799-0258 or request a quote through our Contact Us form.
Project Overview: Starlink Residential Installation in Jacksonville, FL
🔹Location:Jacksonville, FL 🔹Property Type: Residential home 🔹Property Size: 4,426 sqft two-story home 🔹Roof Type: Metal 🔹Starlink Kit: Standard Kit 🔹Mount Solution: Pivot mount and SataMount MRM
Our Starlink Installation SMEs received a service request for Starlink installation in Jacksonville, FL. Our team kick-off the installation process by conducting the following tasks:
1. Pre-Installation Assessment and Planning
Our Starlink installation SME provided professional assistance by performing theinitial offsite assessment. This assessment is allows the team to evaluate the site conditions and specific customer requirements before arriving onsite. Using satellite imagery, customer provided photos and data gathering, our team able to evaluate the following:
🔹Property structure, including size, number of floors, and roof type. 🔹Potential obstructions such as nearby trees and surrounding structures. 🔹Optimal dish mounting locations and required mounting hardware. 🔹Starlink cable routing approach, with or without an existing cable pathway. 🔹Preferred indoor location for the router 🔹Required materials, equipment and tools 🔹Power availability and electrical considerations 🔹Existing network infrastructure in place
After the initial offsite assessment, our team develops a detailed installation plan for the customer’s review and approval. Once approved and all required materials and equipment are available onsite, the installation schedule is coordinated with our professional Starlink installers in Jacksonville, FL.
2. Onsite Starlink Installation
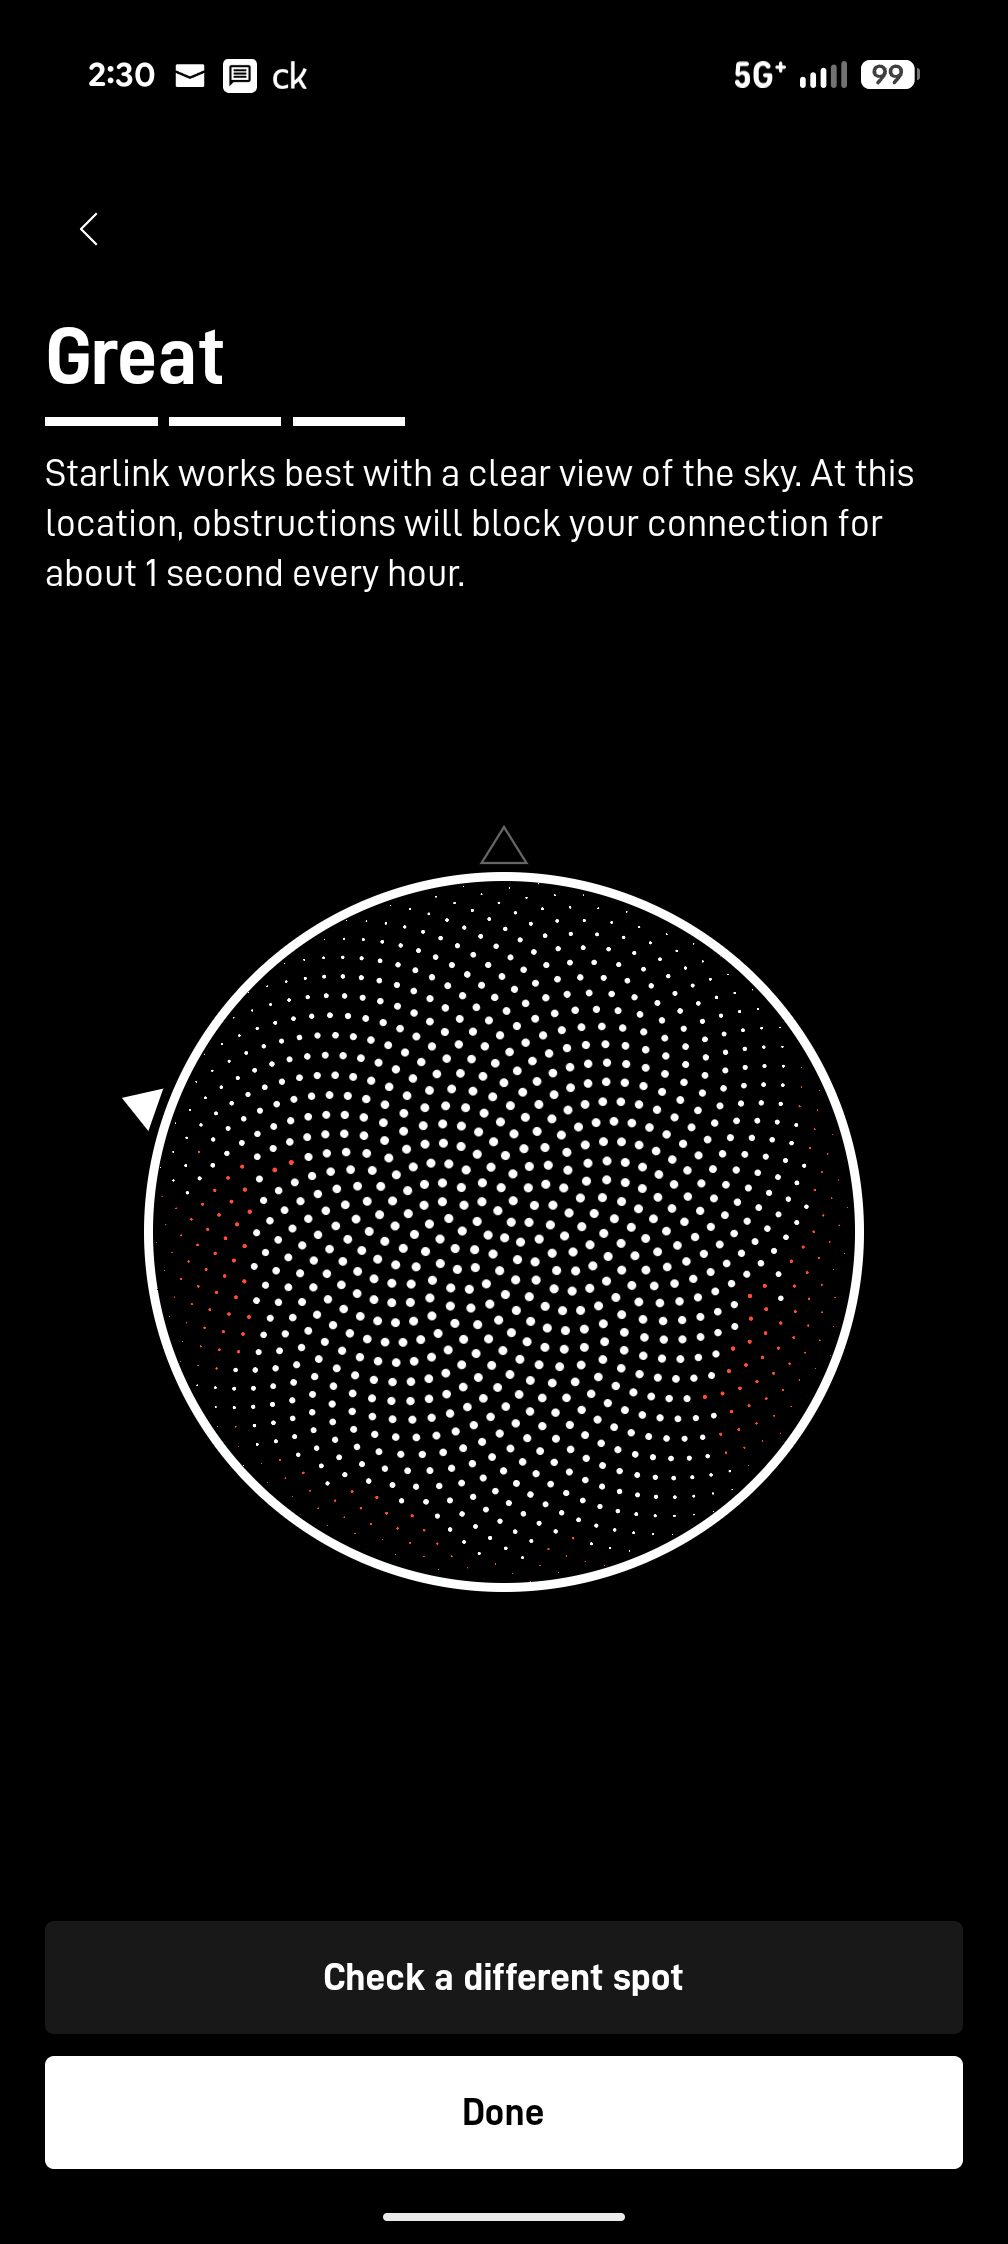
Our professional Starlink installers arrived as scheduled and performed a Starlink Obstructions Test using the Starlink App, a crucial step in determining the ideal placement for the dish. This assessment ensured an unobstructed sky view, maximizing connectivity to the Starlink satellite network. The test yielded a “Good Experience” rating, verifying that the selected location provides a stable and high-speed connection for seamless streaming, browsing, video calls and gaming.
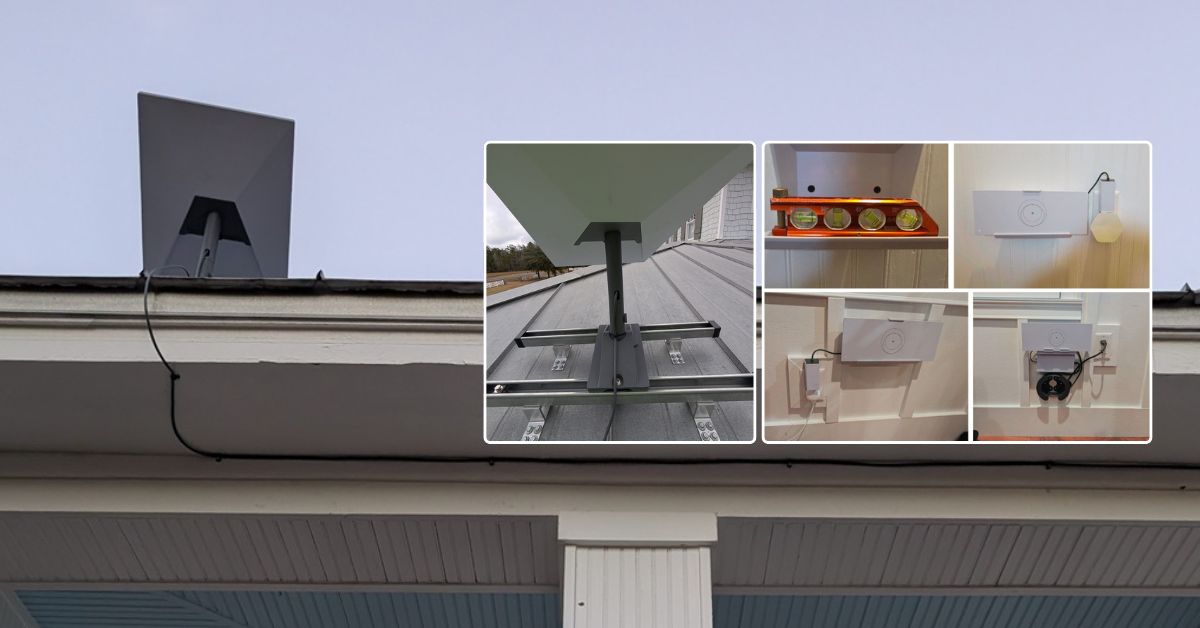
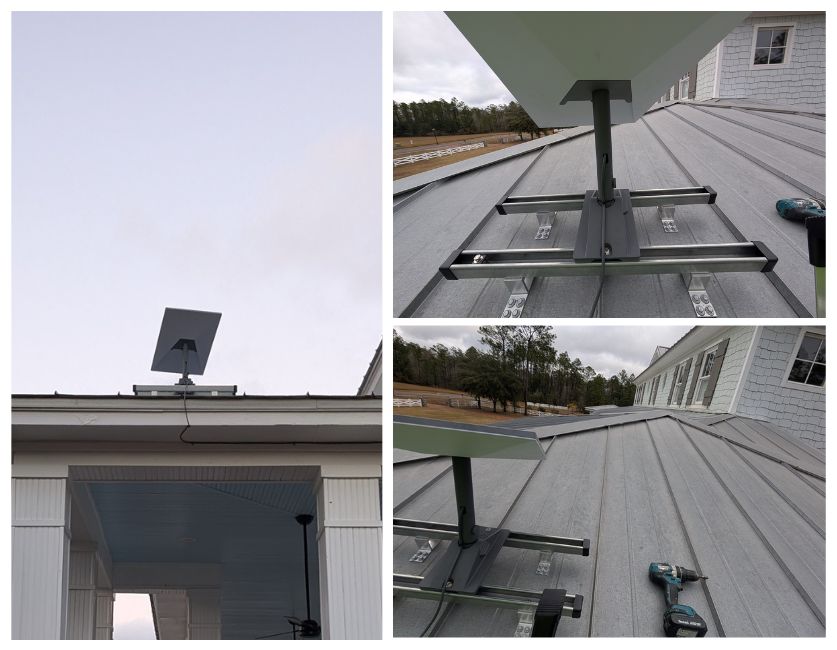
Once the installation point is identified, the Starlink dish is securely installed using a SataMount MRM combined with a pivot mount. This mounting configuration delivers greater holding power with 8 mounting screws to provide long-term stability and wind resistance while keeping the installation clean and roof-safe.
The Starlink cable is routed from the dish down along the roof edge and fascia, then neatly transitioned under the soffit toward the exterior wall. The cable is secured at regular intervals using exterior-rated cable clips, keeping it tight to the structure for a clean and organized appearance. The cable penetrates the exterior wall through a properly sized opening fitted with a rubber grommet, which protects from water intrusion and weather exposure.
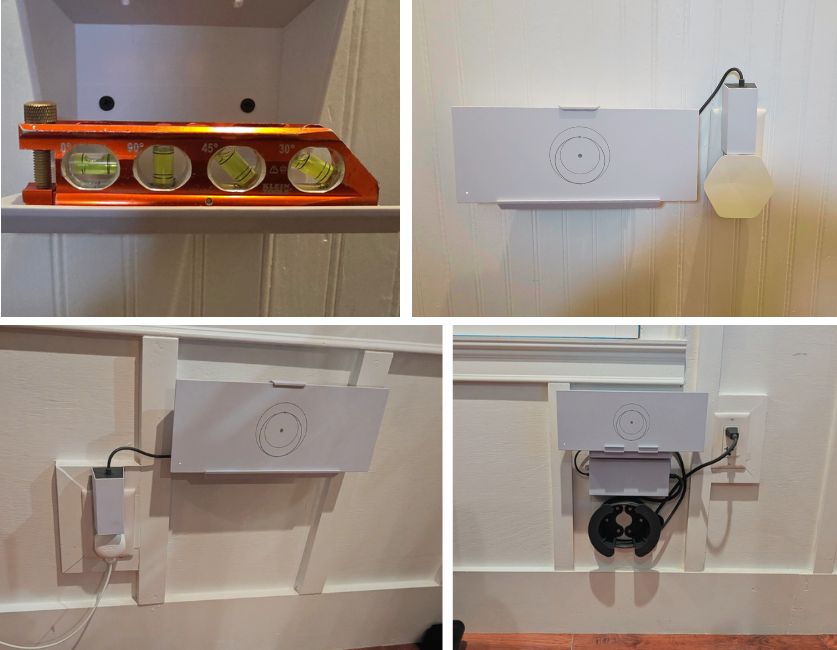
Once the cable is inside the building, it is routed to the planned placement of the Gen3 WiFi Mesh router. The cable is connected to the router and powered on to complete initialization. The wireless network is then configured by setting the SSID and password.Two additional routers are strategically placed throughout the house to extend WiFi coverage across the entire property. Final installation includes wall mounting the routers with precise leveling for stability and clean installation finish.
Finally, the customer was given a walkthrough on how to use the Starlink App's key features, including:
Managing their SSID
Resetting their WiFi password
Running speed tests
Refreshing or resetting the Starlink network
Troubleshooting common connectivity issues
3. Starlink Performance Testing
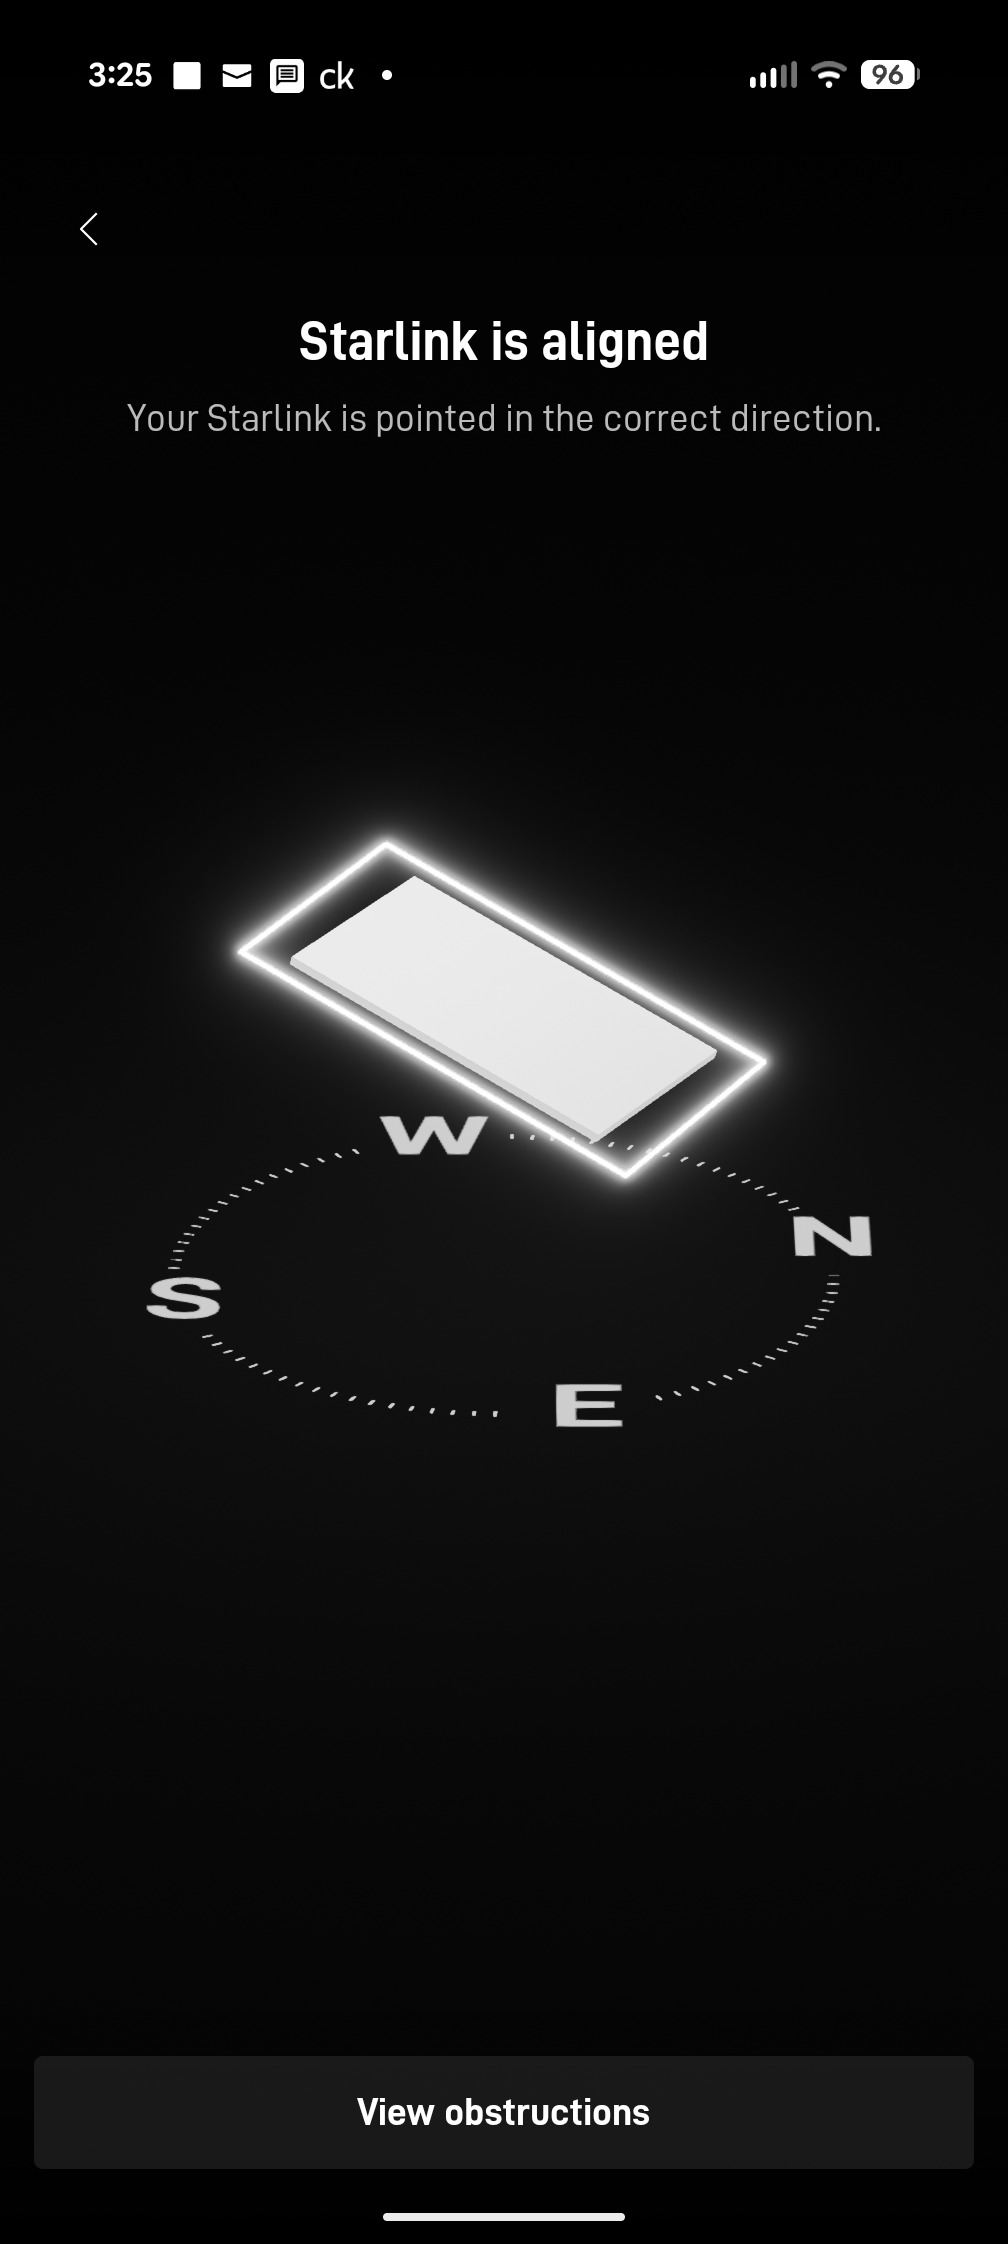
After the installation, our team performed a Starlink alignment test to ensure the dish was in the best possible position for continuous satellite connectivity. The process included carefully assessing the dish’s position, considering the elevation angle, azimuth direction, and potential obstructions (e.g., trees, buildings, or other structures).
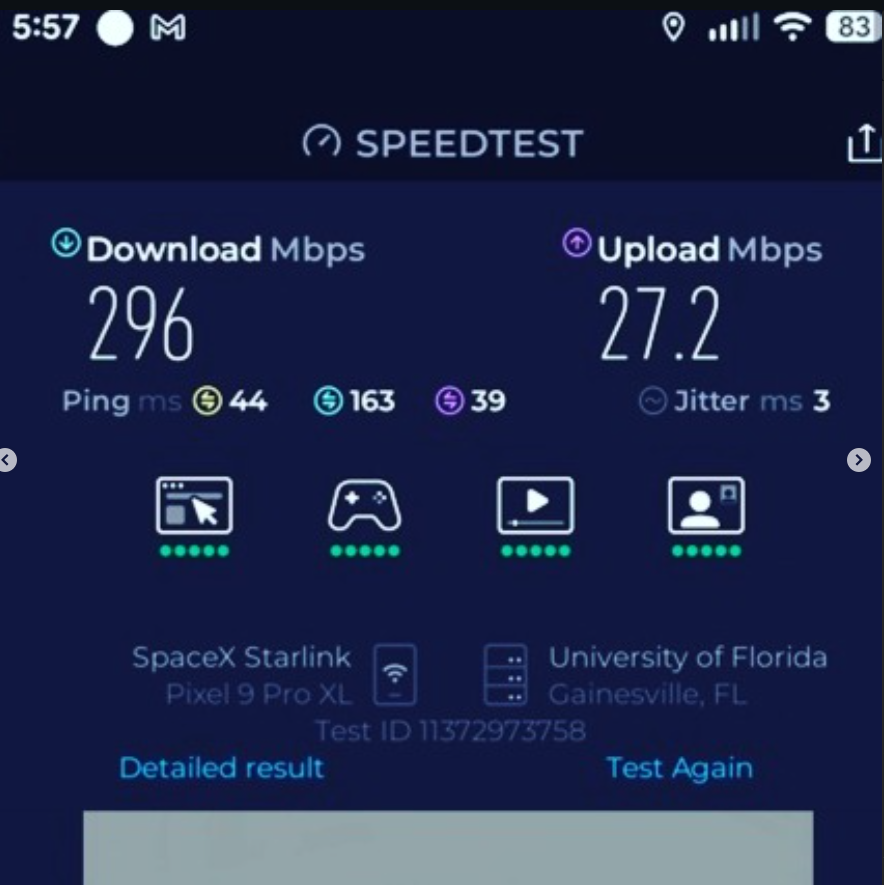
Finally, after the installation, our team conducted a Starlink speed test to confirm the connectivity performance. It measures the three key metrics such as download speed, upload speed and latency.
This speed test confirms that the Starlink setup performs very well, with high download speeds, good upload performance and low latency. This indicates an optimal installation with a clear line of sight to the satellites, minimal obstructions and strong signal strength.
It is important to note that Starlink may take up to 12 hours to fully optimize, scanning the sky to connect with the satellites. Users may experience temporary speed fluctuations or brief dropouts during this process. Once complete, the connection stabilizes, ensuring reliable high-speed internet.
Transform Your Home Connectivity with Starlink
Call us at 1-844-799-0258 to schedule your Starlink installation or to address any service-related inquiries.
ProSat Networks Serviceable Areas in Florida
We also offer Starlink installation and IT network design, installation & support to the towns and cities including:
Jacksonville is the largest city by land area in the contiguous United States, covering more than 840 square miles. Its size allows it to support a diverse economy that includes logistics, healthcare, military, finance, port operations, and a growing technology sector, making it a major hub in Northeast Florida.
Thank you for reading our Starlink installation articles.
.jpg)